EduConnect Developer Guide
Acknowledgements
Project is based off of the AddressBook3 (AB3 Source Code)
URL Regex Validation - Adapted solution from Mustofa Rizwan
Setting up, getting started
Refer to the guide Setting up and getting started.
Design
Architecture

The Architecture Diagram given above explains the high-level design of the App.
Given below is a quick overview of main components and how they interact with each other.
Main components of the architecture
Main (consisting of classes Main and MainApp) is in charge of the app launch and shut down.
- At app launch, it initializes the other components in the correct sequence, and connects them up with each other.
- At shut down, it shuts down the other components and invokes cleanup methods where necessary.
The bulk of the app's work is done by the following four components:
UI: The UI of the App.Logic: The command executor.Model: Holds the data of the App in memory.Storage: Reads data from, and writes data to, the hard disk.
Commons represents a collection of classes used by multiple other components.
How the architecture components interact with each other
The Sequence Diagram below shows how the components interact with each other for the scenario where the user issues the command edit i:1 s/A0123456X.

Each of the four main components (also shown in the diagram above),
- defines its API in an
interfacewith the same name as the Component. - implements its functionality using a concrete
{Component Name}Managerclass (which follows the corresponding APIinterfacementioned in the previous point).
For example, the Logic component defines its API in the Logic.java interface and implements its functionality using the LogicManager.java class which follows the Logic interface. Other components interact with a given component through its interface rather than the concrete class (reason: to prevent outside component's being coupled to the implementation of a component), as illustrated in the (partial) class diagram below.

The sections below give more details of each component.
UI component
The API of this component is specified in Ui.java

The UI consists of a MainWindow that is made up of parts e.g.CommandBox, ResultDisplay, StudentListPanel, StatusBarFooter etc. All these, including the MainWindow, inherit from the abstract UiPart class which captures the commonalities between classes that represent parts of the visible GUI.
The UI component uses the JavaFx UI framework. The layout of these UI parts are defined in matching .fxml files that are in the src/main/resources/view folder. For example, the layout of the MainWindow is specified in MainWindow.fxml
The UI component,
- executes user commands using the
Logiccomponent. - listens for changes to
Modeldata so that the UI can be updated with the modified data. - keeps a reference to the
Logiccomponent, because theUIrelies on theLogicto execute commands. - depends on some classes in the
Modelcomponent, as it displaysStudentobject residing in theModel.
Logic component
API : Logic.java
Here's a (partial) class diagram of the Logic component:

The activity diagram below shows what happens in the DeleteCommandParser and DeleteCommand class when delete is used by the user
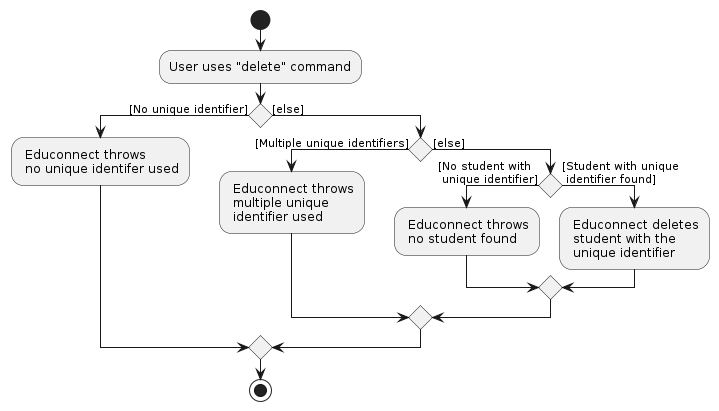
How the Logic component works:
- When
Logicis called upon to execute a command, it is passed to anAddressBookParserobject which in turn creates a parser that matches the command (e.g.,DeleteCommandParser) and uses it to parse the command. - This results in a
Commandobject (more precisely, an object of one of its subclasses e.g.,DeleteCommand) which is executed by theLogicManager. - The command can communicate with the
Modelwhen it is executed (e.g. to delete a student).
Note that although this is shown as a single step in the diagram above (for simplicity), in the code it can take several interactions (between the command object and theModel) to achieve. - The result of the command execution is encapsulated as a
CommandResultobject which is returned back fromLogic.
Here are the other classes in Logic (omitted from the class diagram above) that are used for parsing a user command:

How the parsing works:
- When called upon to parse a user command, the
AddressBookParserclass creates anXYZCommandParser(XYZis a placeholder for the specific command name e.g.,AddCommandParser) which uses the other classes shown above to parse the user command and create aXYZCommandobject (e.g.,AddCommand) which theAddressBookParserreturns back as aCommandobject. - All
XYZCommandParserclasses (e.g.,AddCommandParser,DeleteCommandParser, ...) inherit from theParserinterface so that they can be treated similarly where possible e.g, during testing.
Model component
API : Model.java

The Model component,
- stores the address book data i.e., all
Studentobjects (which are contained in aUniqueStudentListobject). - stores the currently 'selected'
Studentobjects (e.g., results of a search query) as a separate filtered list which is exposed to outsiders as an unmodifiableObservableList<Student>that can be 'observed' e.g. the UI can be bound to this list so that the UI automatically updates when the data in the list change. - stores a
UserPrefobject that represents the user’s preferences. This is exposed to the outside as aReadOnlyUserPrefobjects. - does not depend on any of the other three components (as the
Modelrepresents data entities of the domain, they should make sense on their own without depending on other components)
Note: An alternative (arguably, a more OOP) model is given below. It has a Tag list in the AddressBook, which Student references. This allows AddressBook to only require one Tag object per unique tag, instead of each Student needing their own Tag objects.

Storage component
API : Storage.java

The Storage component,
- can save both address book data and user preference data in JSON format, and read them back into corresponding objects.
- inherits from both
AddressBookStorageandUserPrefStorage, which means it can be treated as either one (if only the functionality of only one is needed). - depends on some classes in the
Modelcomponent (because theStoragecomponent's job is to save/retrieve objects that belong to theModel)
Common classes
Classes used by multiple components are in the educonnect.commons package.
Implementation
This section describes some noteworthy details on how certain features are implemented.
Timetable Support
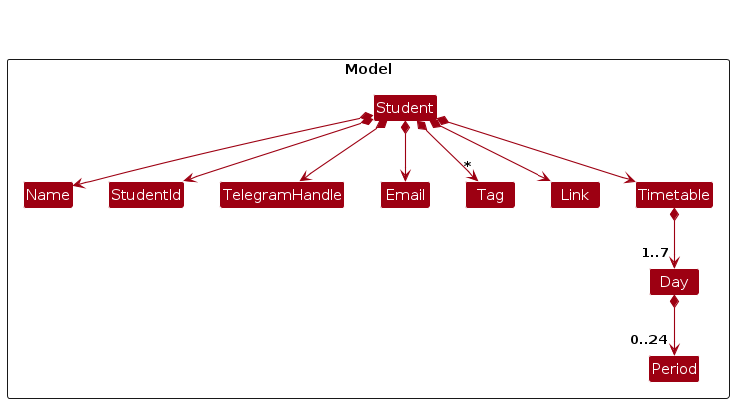
- Each
Studentobject now has aTimetableobject as an attribute. - Each
Timetablecontains 5 or 7Dayobjects, by default, 5 days of the week (Monday - Friday) is used. - Each
Dayobject can contain 0 to 24 1-hourPeriodobjects, or less if eachPeriodhas intervals longer than 1 hour. - Each
Periodis defined by the start time and end time, indicated by integers on a 24-hour clock, i.e. 0-23, which refers to 12 AM till 11 PM. - Each
Daycannot contain any overlappingPeriod.- An overlap occurs when the start time of the previous
Periodis before the end time of the nextPeriod. - E.g. for the case of
Periodof 12-14,Periodof 14-16 is allowed, butPeriodof 13-15 is not.
- An overlap occurs when the start time of the previous
- If not specified in the
addcommand, or subsequently modified using theeditcommand, theTimetableis assumed to be empty, indicating no occupied period.
Listing students with timetables option
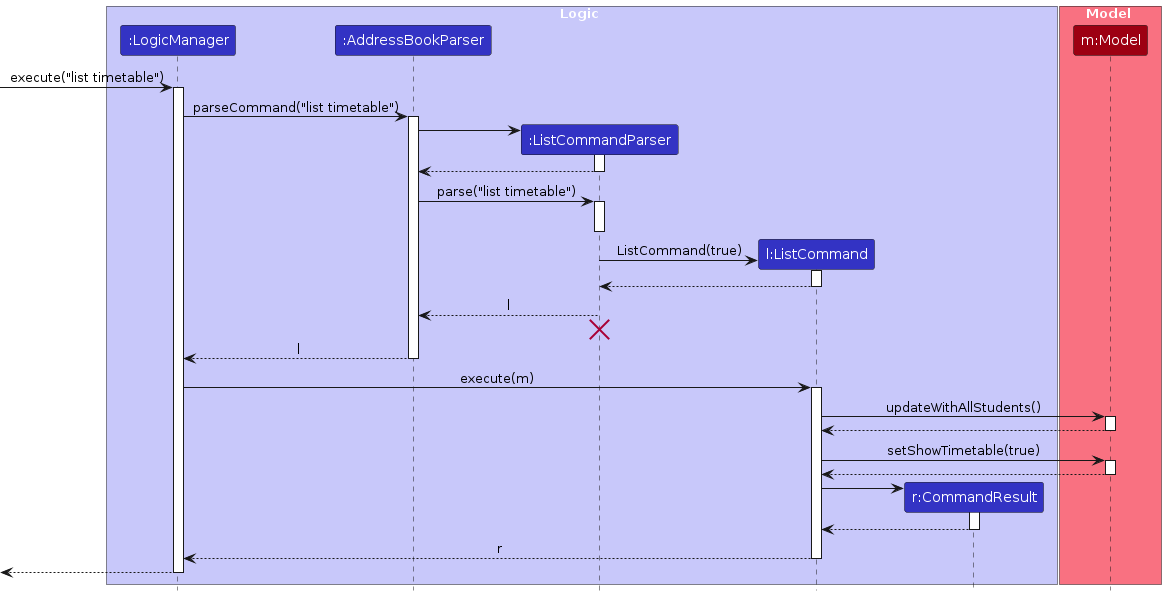
The
Timetableof theStudentshown during thelistcommand, followed by atimetablekeyword.The
timetablekeyword is optional, and if the command is used without thetimetablekeyword, students will be shown without timetables.The option of displaying timetables will be saved and will remain the same for subsequent commands, unless another
listcommand with different option is received.Each time the application is launched, the timetable will be hided in default.
Below shows the sequence diagram when listing students with timetables.
Adding/Editing a Student's Timetable
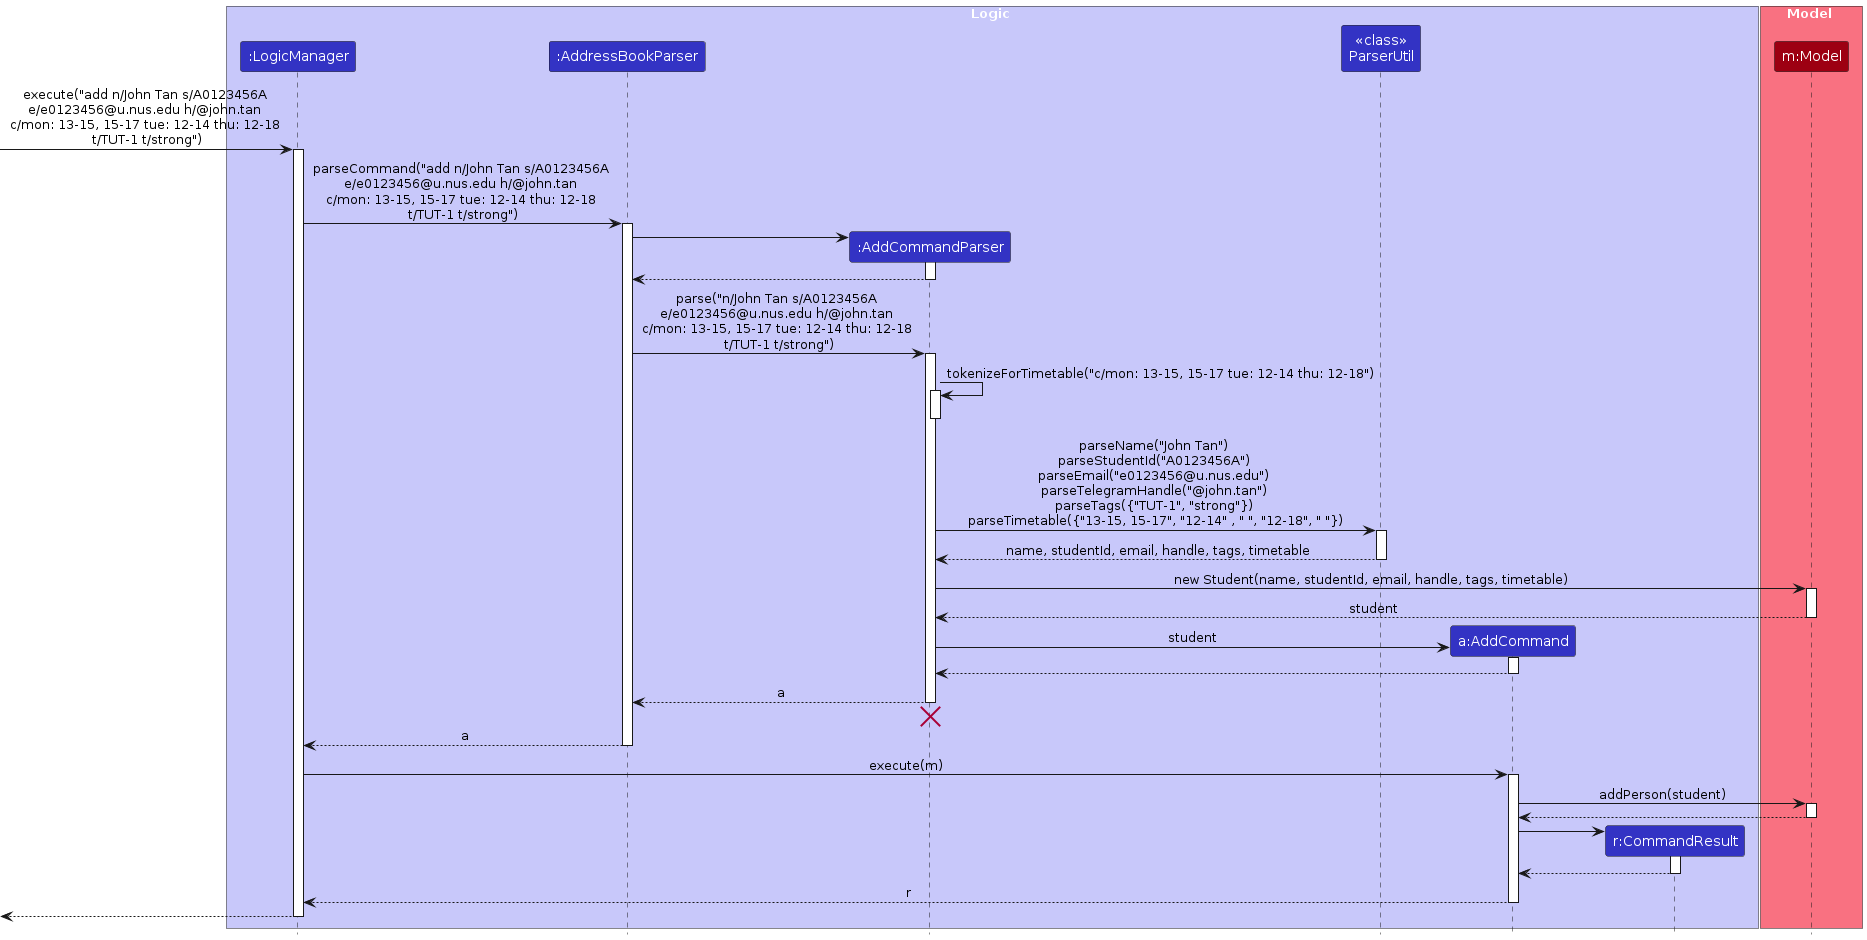
- The
Timetableof theStudentcan be specified during theaddcommand, indicated with ac/prefix. - Similarly, the
Timetableof aStudentcan be modified during theeditcommand, with the same prefix. - The
c/prefix is optional, and if not specified, an emptyTimetableobject will be created as the attribute of theStudent.- The arguments for the
Timetableobject can be broken down into its respective day and periods that day contains. - The day is indicated by its respective prefix as well, the format is
{DAY_3_LETTERS}:, e.g."mon:"or"fri:". - The period follows this format
{HOUR-HOUR}, in a 24-hour clock, e.g. "12-14", indicating 12 PM to 2 PM. - E.g. an accepted
Stringis"mon: 13-15, 15-17 tue: 12-14 thu: 12-18".
- The arguments for the
- Below shows the sequence diagram when adding a student.
Finding Common Slots from list of Students (can be filtered)
The finding a common slot feature will have a portion implemented similarly to the find command.
The command consists of a mandatory specified duration, and optional arguments for higher specificity,
and a common empty slot across all students that fulfils the duration requirement will be outputted to the user.
The command is implemented as such:
slots d/DURATION [t/TAG] [p/TIMEFRAME_PERIOD] [o/ON_WHICH_DAYS]d/is the prefix for duration.t/is an optional argument for a filtered list of students.- if not specified, defaults to looking through the entire list of students in EduConnect.
p/is an optional argument for specifying the timeframe to look for slots.- if not specified, defaults to 8 AM to 10 PM.
o/is an optional argument for on which days specifically to look for slots.- if not specified, defaults to Monday to Friday.
Examples:
slot d/1- EduConnect will look through the current list of students, i.e. can be the full list, or a filtered list if ran after thefindcommand, then returns all the 1-hour slot(s) available for the week.slot d/2 t/tutorial-1- EduConnect will first filter and get the list of students with the tagtutorial-1, then return all the 2-hour slot(s) available for the week.slot d/3 p/12-18 o/tue, wed, thu t/tutorial-2- EduConnect will first filter and get the list of students with the tagtutorial-2, then returns all the 3-hour slot(s) available, between 12 PM to 6 PM, on Tuesdays, Wednesdays, and Thursdays only.
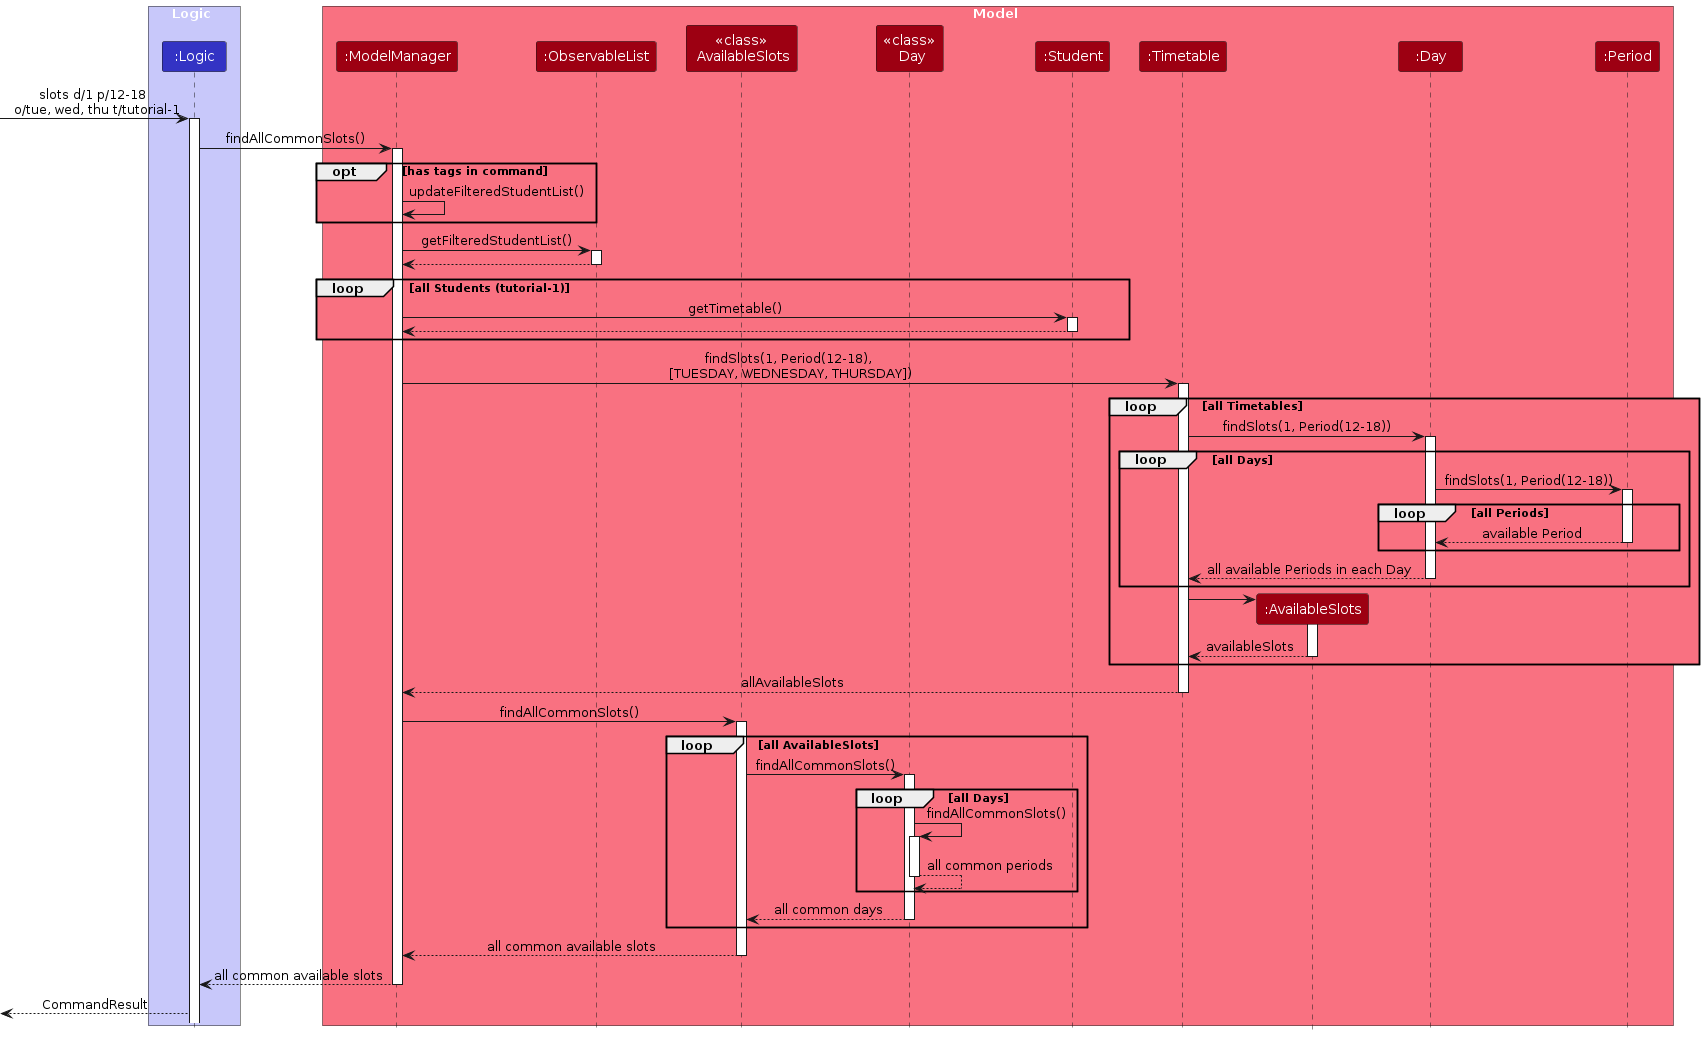
The command's execution will iterate through the selected list of students, accessing each
Timetableobject's list ofDayobjects.- Each
Dayobject will look for validPeriodthat does not overlap with its own list ofPeriodobjects. - The series of valid
PeriodandDaywill be collected from eachTimetableof eachStudent, and returned as anAvailableSlotsobjects, which is collected in aList. - Common slots across all
AvailableSlotswill then be filtered out and returned as a singularAvailableSlotsobject.
- Each
The diagram below shows the sequence diagram for an example execution of finding common slots.
{more functionality to be implemented in later versions}
Website URL support
The inclusion of the Link attribute enhances the versatility of EduConnect, enabling storage and access to project or assignment weblinks for each student. This feature facilitates efficient collaboration and evaluation by Teaching Assistants (TAs) and provides students with a convenient means to showcase their work.
- Each
Studenthas an additional attributeLink Linkis responsible for storing the student's project or assignment weblink for ease of access by the TA.Linkis wrapped around a JavaOptionalinStudent. This means that if the link is not specified during construction of a newStudent, the student'sLinkattribute will initialized asOptional.empty.Linkmust be a valid URL, and a validation regex is present to check the validity of thelink.- In scenarios involving group projects, the
Linkattribute need not be unique as group members will share the same project link. Therefore, enforcing uniqueness for theLinkattribute could lead to unnecessary constraints and complexity.
Valid URLs accepted
The regex used for validating the URL is as shown below:
^(?<scheme>(?:ftp|https?):\/\/)?+
(?:
    (?<username>[a-zA-Z][\w-.]{0,31})
    (?::(?<password>[!-~&&[^@$\n\r]]{6,255}))?
@)?
(?<subdomain>(?:[a-zA-Z0-9][a-zA-Z0-9-]{0,61}[a-zA-Z0-9]?\.){0,127})
(?<domain>[a-zA-Z0-9][a-zA-Z0-9-]{1,61}[a-zA-Z0-9])
(?<tld>\.[a-zA-Z]{3,63})
(?<cctld>\.[a-zA-Z]{2})?
(?<portnumber>:\d{1,5})?
(?<path>(?:\/{1,2}[\w-@.~()%]*)*)
(?<querystring>\?(?:[\w-%]+=[\w-?/:@.~!$&'()*+,;=%]+(?:&[\w-%]+=[\w-?/:@.~!$&'()*+,;=%]+)*)?)?
(?<fragment>#[\w-?/:@.~!$&'()*+,;=%]+)?$
The capture group plan is:
| Group Number | Group name | Example |
|---|---|---|
| 1 | scheme | ftp:// http:// https:// |
| 2 | username | user schooluser |
| 3 | password | password123 PxJmot@S!KL1 |
| 4 | subdomain | www. blog. news. |
| 5 | domain | google youtube github |
| 6 | tld | .com .net .org |
| 7 | cctld | .sg .jp .uk .de |
| 8 | port | :8080 :443 :53 |
| 9 | path | /article /tp/UserGuide.html |
| 10 | querystring | ?q=cat ?q=pokemon+red&ie=UTF-8 |
| 11 | fragment | #xpointer(//Rube) #dfsdf |
UI implementation
- A student's weblink will be displayed using the JavaFX
Hyperlinkclass atStudentCard.java. - Due to potential UI issues arising from excessively long URLs, a clickable embedded text labeled "Project Link" will be displayed instead of the actual URL.
- If the student has a valid Link, the Hyperlink will be visible and clickable, allowing users to access the weblink directly.
- If the student does not have a Link attribute or if the Link is not specified, the Hyperlink will be toggled to be invisible, ensuring a clean and uncluttered user interface.
Adding/Editing a student's Link
- Just like any other attribute of
Student,Linkcan be specified during theaddcommand, indicated with al/prefix. - When creating a new
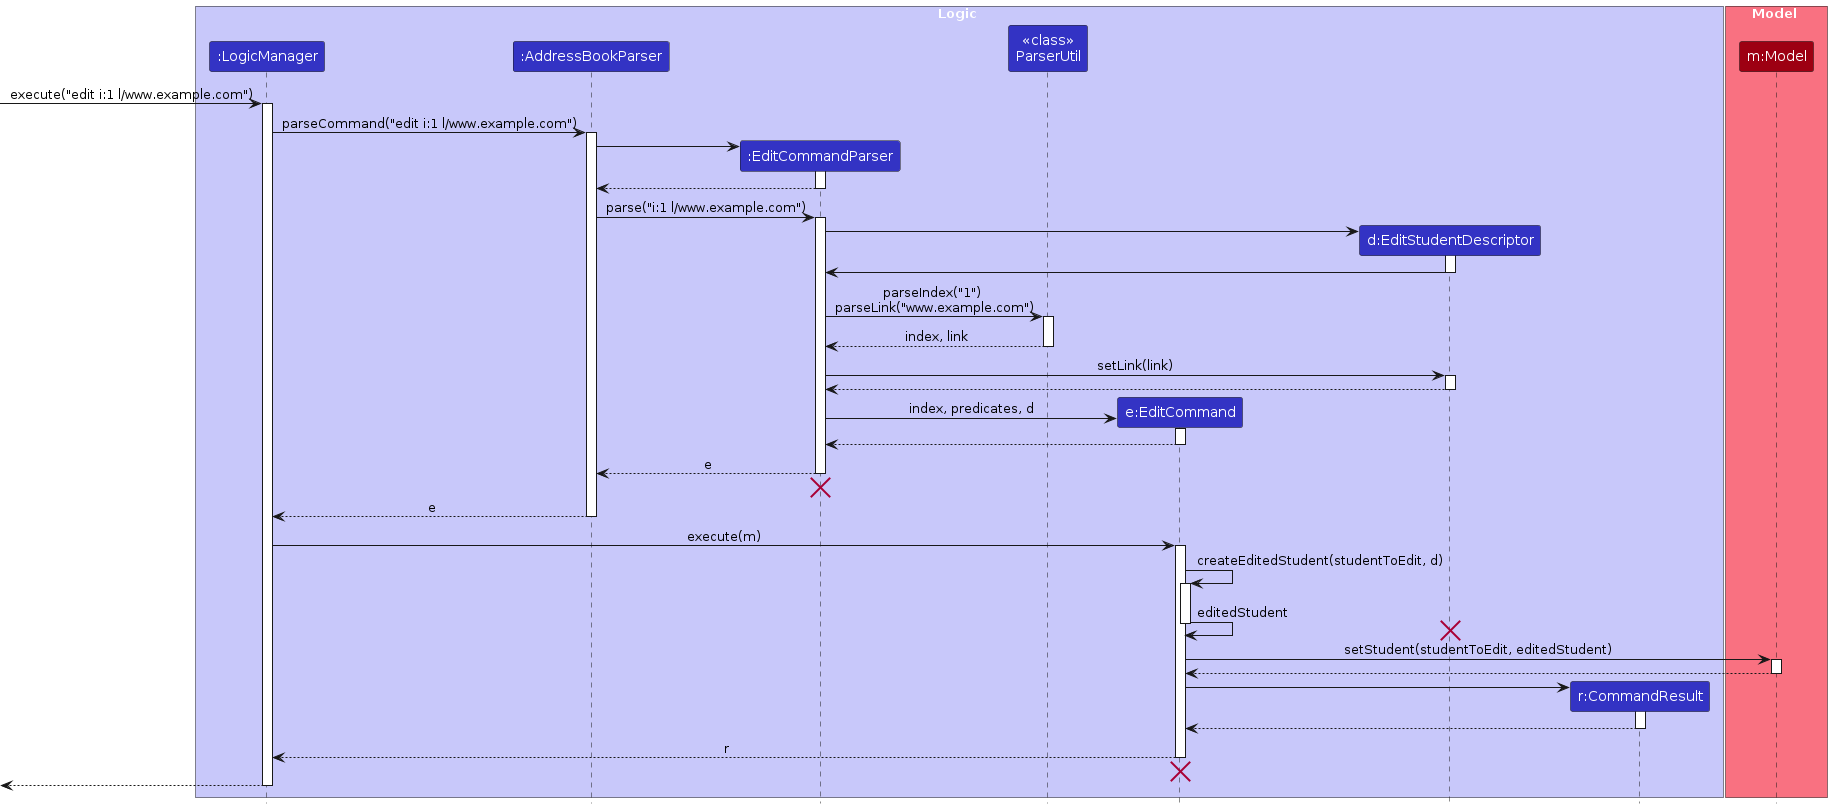
Studentusing the add command, thel/prefix is optional. Linkcan also be modified using theeditcommand with thel/prefix.- Below shows the sequence diagram when editing a student's
Link.
Copy Emails to Clipboard feature
Implemented similarly to the find command, the copy command first filters the FilteredList<Student> to display all students with the tags specified in the command.
- E.g.
copy t/tutorial-1filters and displays all students with the exact tagtutorial-1.
The FilteredList<Student> is then iterated through, retrieving all student emails in the list and joining by , delimiter (ascii hexadecimal 0x2C comma and 0x20 space).
- Emails are concatenated in the form of
example1@email.com, example2@email.com, example3@email.com. - This adheres to the format specified in section 3.4 of RFC5322, which allows for easy pasting into
Gmail,Outlook,Yahoo Mail, etc.
Implementation using JavaFX Library
The feature is implemented using javafx.scene.input.Clipboard instead of java.awt.datatransfer.Clipboard as we are using JavaFX for the UI.
The fomatted email string is added to Clipboard as a plain text String text/plain (NOT a HTML String text/html).
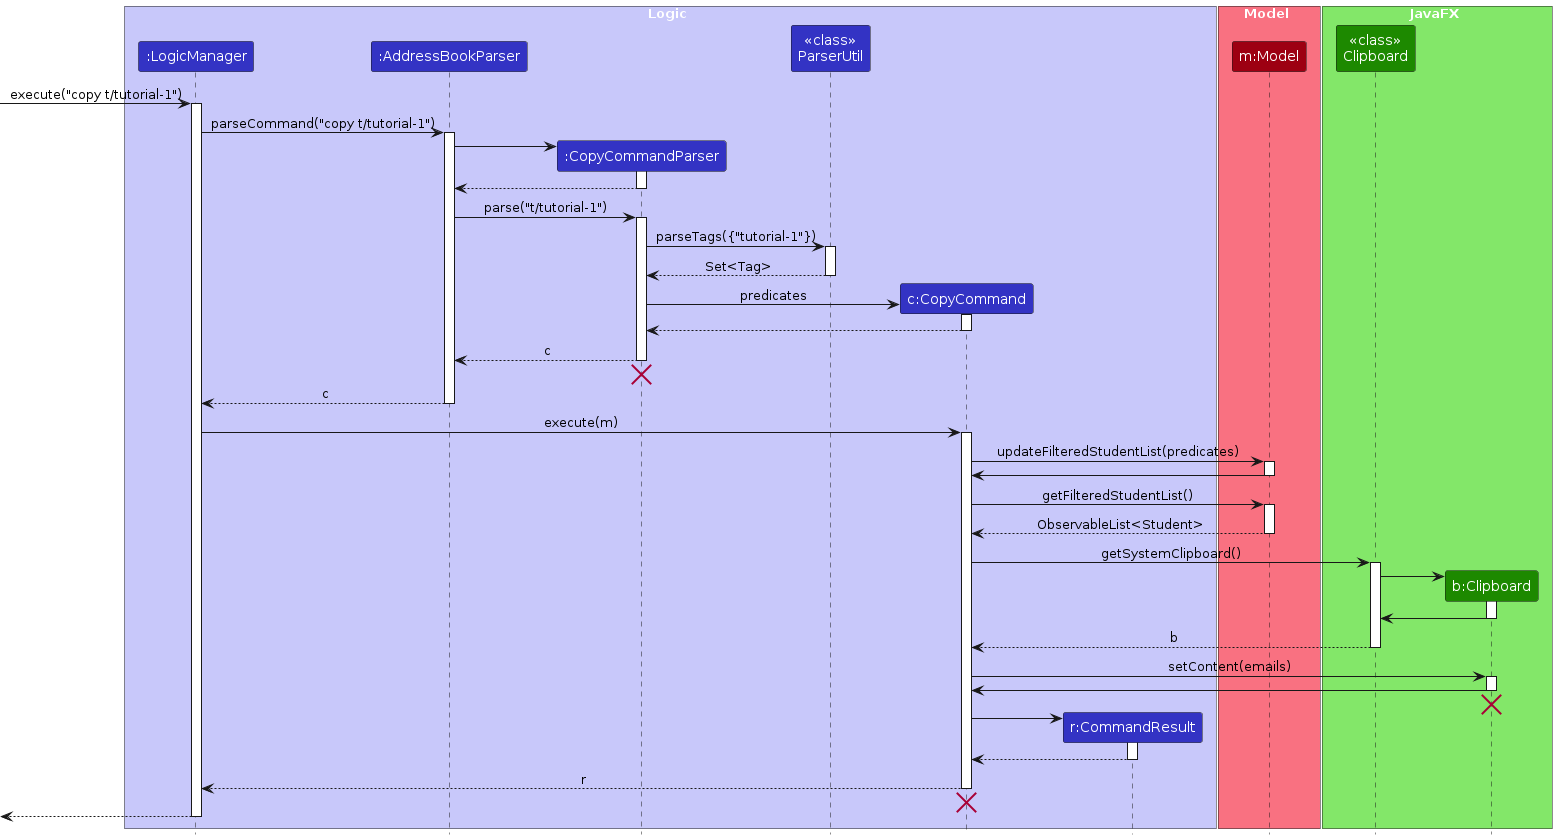
- The diagram below shows the sequence diagram for
copy t\tutorial-1.
[Proposed] Undo/redo feature
Proposed Implementation
The proposed undo/redo mechanism is facilitated by VersionedAddressBook. It extends AddressBook with an undo/redo history, stored internally as an addressBookStateList and currentStatePointer. Additionally, it implements the following operations:
VersionedAddressBook#commit()— Saves the current address book state in its history.VersionedAddressBook#undo()— Restores the previous address book state from its history.VersionedAddressBook#redo()— Restores a previously undone address book state from its history.
These operations are exposed in the Model interface as Model#commitAddressBook(), Model#undoAddressBook() and Model#redoAddressBook() respectively.
Given below is an example usage scenario and how the undo/redo mechanism behaves at each step.
Step 1. The user launches the application for the first time. The VersionedAddressBook will be initialized with the initial address book state, and the currentStatePointer pointing to that single address book state.

Step 2. The user executes delete s/A1234567X command to delete the student with that unique identifier in the address book. The delete command calls Model#commitAddressBook(), causing the modified state of the address book after the command executes to be saved in the addressBookStateList, and the currentStatePointer is shifted to the newly inserted address book state.

Step 3. The user executes add n/David … to add a new student. The add command also calls Model#commitAddressBook(), causing another modified address book state to be saved into the addressBookStateList.

Note: If a command fails its execution, it will not call Model#commitAddressBook(), so the address book state will not be saved into the addressBookStateList.
Step 4. The user now decides that adding the student was a mistake, and decides to undo that action by executing the undo command. The undo command will call Model#undoAddressBook(), which will shift the currentStatePointer once to the left, pointing it to the previous address book state, and restores the address book to that state.

Note: If the currentStatePointer is at index 0, pointing to the initial AddressBook state, then there are no previous AddressBook states to restore. The undo command uses Model#canUndoAddressBook() to check if this is the case. If so, it will return an error to the user rather
than attempting to perform the undo.
The following sequence diagram shows how an undo operation goes through the Logic component:
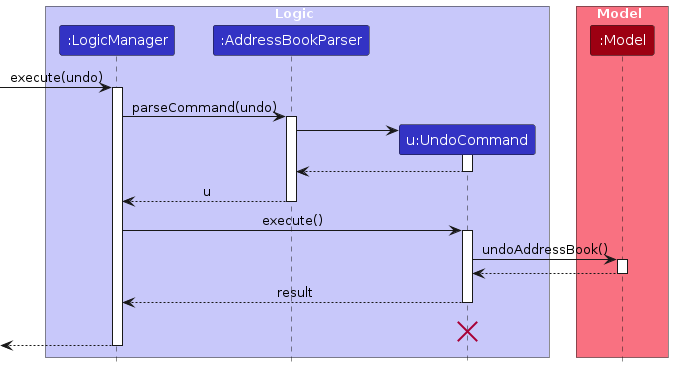
Note: The lifeline for UndoCommand should end at the destroy marker (X) but due to a limitation of PlantUML, the lifeline reaches the end of diagram.
Similarly, how an undo operation goes through the Model component is shown below:
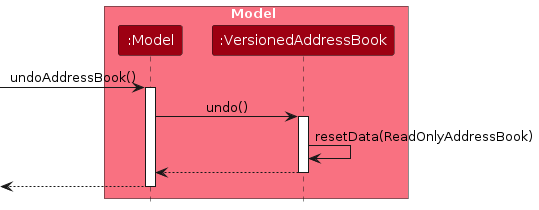
The redo command does the opposite — it calls Model#redoAddressBook(), which shifts the currentStatePointer once to the right, pointing to the previously undone state, and restores the address book to that state.
Note: If the currentStatePointer is at index addressBookStateList.size() - 1, pointing to the latest address book state, then there are no undone AddressBook states to restore. The redo command uses Model#canRedoAddressBook() to check if this is the case. If so, it will return an error to the user rather than attempting to perform the redo.
Step 5. The user then decides to execute the command list. Commands that do not modify the address book, such as list, will usually not call Model#commitAddressBook(), Model#undoAddressBook() or Model#redoAddressBook(). Thus, the addressBookStateList remains unchanged.

Step 6. The user executes clear, which calls Model#commitAddressBook(). Since the currentStatePointer is not pointing at the end of the addressBookStateList, all address book states after the currentStatePointer will be purged. Reason: It no longer makes sense to redo the add n/David … command. This is the behavior that most modern desktop applications follow.

The following activity diagram summarizes what happens when a user executes a new command:

Design considerations:
Aspect: How undo & redo executes:
Alternative 1 (current choice): Saves the entire address book.
- Pros: Easy to implement.
- Cons: May have performance issues in terms of memory usage.
Alternative 2: Individual command knows how to undo/redo by itself.
- Pros: Will use less memory (e.g. for
delete, just save the student being deleted). - Cons: We must ensure that the implementation of each individual command are correct.
- Pros: Will use less memory (e.g. for
{more aspects and alternatives to be added}
[Proposed] Data archiving
{Explain here how the data archiving feature will be implemented}
Documentation, logging, testing, configuration, dev-ops
Appendix A: Requirements
Product scope
Target user profile:
- Teaching Assistants, managing one or more classes.
- Prefers typing to mouse interactions
- Is reasonably comfortable using CLI apps
Value proposition: Our app helps you, an active TA, manage contact details of students in both big or small tutorial classes. Keep track of student progress, access links to their projects, or simply de-conflict class schedules.
User stories
Priorities: High (must have) - * * *, Medium (nice to have) - * *, Low (unlikely to have) - *
| Priority | As a … | I want to … | So that I can… |
|---|---|---|---|
* * * | new user | see usage instructions | refer to instructions when I forget how to use the App |
* * * | user | add a new student | |
* * * | user | delete a student | remove entries that I no longer need |
* * * | user | find a student by name / email / student ID | locate details of students without having to go through the entire list |
* * | user | filter students by their class / skill group | view details belonging to sub-group of student instead of the full list |
* * | user | edit an existing student | not have to delete and add a new student if I want to change one attribute |
* * | user | find a common available time slot amongst my students | set up a consultation / meeting / additional session(s) |
* | user with many students in the address book | filter students by their tag (class or skill group) | locate a student easily |
* | user who uses this long-term | purge all existing data | reset this application for each new semester |
* | user | have quick access for help on specific commands | get reminders / assistance on commands directly from the application |
{More to be added}
Use cases
System: EduConnect
Use Case: UC1 - Adding a class of students (tagged by class)
Actor: TA
MSS:
- TA enters command to add student S1 with class A tag
- EduConnect creates student S1
- TA repeats step 1 for all students to be added under class A
Use case ends.
Extensions:
- 1a. EduConnect detects an invalid student ID, email, etc.
- 1a1. EduConnect informs TA of the invalid field entered.
- 1a2. TA enters new student data.
- 1a3. Steps 1a1-1a2 are repeated until the student is added successfully.
- 1a4. Use case resumes from step 3.
System: EduConnect
Use Case: UC2 - List all student contacts in a tutorial class
Actor: TA
MSS:
- TA enters filter command with specified tutorial class name
- Educonnect returns list of all students in the tutorial class
Extensions:
- 1a. The tutorial class name is not valid
- 1a1. EduConnect outputs error message to user
- 1b. EduConnect detects an error in the command format
- 1b1. EduConnect outputs error message to user
Use Case ends
System: EduConnect
Use Case: UC3 - Delete students from existing contacts in a tutorial class
Actor: TA
MSS:
- TA enters the remove command to delete an existing student info in a tutorial class
- EduConnect deletes the specified student
Extensions:
- 1a. The student does not exist
- 1a1. EduConnect outputs error message to user
- 1b. EduConnect detects an error in the command format
- 1b1. EduConnect outputs error message to user
System: EduConnect
Use Case: UC4 - Find students from existing contacts by their name
Actor: TA
MSS:
- TA enters the find command to find an existing student info
- EduConnect returns the students with a matching/partially matching word(s)
Extensions:
- 1a. EduConnect cannot find the student with specified name
- 1a1. EduConnect outputs no match error message to user
- 1b. EduConnect detects an error in the command format
- 1b1. EduConnect outputs error message to user
Use Case ends
System: EduConnect
Use Case: UC5 - TA finds a common time slot amongst one class of students
Actor: TA
- TA opens the application.
- TA keys in the command to find a common time slot for a specific class.
- EduConnect finds a common time slot using the student’s timetable.
Use case ends.
Extensions:
- 3a. EduConnect is unable to find a common timeslot.
- 3a1. EduConnect shows an error message. Use case ends.
System: EduConnect
Use Case: UC6 - Exploring the application for the first time
Actor: TA (First-time user of the product)
MSS:
- TA opens the application.
- TA is able to see a set of sample contacts pre-loaded into the application as examples.
- TA keys in ‘help’ command.
- EduConnect brings up a list of commands that it accepts.
- TA keys in various commands. (Refer to UC2, UC4, UC5, UC6 …)
- TA keys in ‘wipe’ command.
- EduConnect erases all data.
Use case ends.
Non-Functional Requirements
- Should work on any mainstream OS as long as it has Java
11or above installed. - Program should be able to handle multiple classes (at least 5) with each having more than 50 students
- The system should be able to be used by a novice who has never used the product before.
- The system should respond within 2 seconds after a command.
Glossary
- CS2040: Data Structures and Algorithms Course in School of Computing, NUS
- Kattis: Website with competitive programming problems, used by CS2040 students for their take-home assignments
- NUS: National University of Singapore
- SoC: School of Computing
- Skill group: Students who are grouped similarly by their ability and score in CS2040
- TAs: Teaching assistants
- Telegram: Preferred online messaging application used amongst students and TAs.
Appendix B: Instructions for manual testing
Given below are instructions to test the app manually.
Note: These instructions only provide a starting point for testers to work on; testers are expected to do more exploratory testing.
Launch and shutdown
Initial launch
Download the jar file and copy into an empty folder
Double-click the jar file
- Expected: Shows the GUI with a set of sample contacts. The window size may or may not be optimum.
Saving window preferences
Resize the window to an optimum size.
Move the window to a different location.
Close the window.
Re-launch the app by double-clicking the jar file.
- Expected: The most recent window size and location is retained.
Explore other test cases...
Listing all students
Listing all students in the address book.
Test case:
list- Expected: All students showing without timetables.
Test case:
list timetable- Expected: All students showing with timetables appearing in student cards.
Deleting a student
Deleting a student while all students are being shown
Prerequisites: List all students using the
listcommand. Multiple students in the list.Test case:
delete s/A1234567X- Expected: Student with student id A1234567X is deleted from the list. Details of the deleted student shown in the status message. Timestamp in the status bar is updated.
Test case: (No such student with unique identifier)
delete s/A0000000U- Expected: No student is deleted. No such student error details shown in the status message. Status bar remains the same.
Other incorrect delete commands to try:
delete,delete x,...(where x is a non-unique identifier prefix)- Expected: Error thrown with corresponding invalid commands.
Explore other test cases...
Saving data
Dealing with missing/corrupted data files
Prerequisites: At least one student in the addressbook. Confirm using the
listcommand.Navigate to the directory with the EduConnect jar file.
If not done, open EduConnect by double-clicking on the jar file.
Navigate to
./dataand openaddressbook.jsonin your preferred text editor.Remove a field in any of the json data, save and exit.
Open the EduConnect.
- Expected: EduConnect opens with an empty addressbook.
Explore other test cases...
Appendix C: Effort
Overview
- Our team aims at creating an application that is easy to use and helpful for TAs to manage courses. We mainly focused on features that are optimized for CLI users.
- In addition to the existing basic features of AB3 (Address Book 3), we implement additional features including finding students, copying emails, and finding common slots for our target users - TAs.
Difficulty Level and Challenges Faced
Build the application upon AB3 was a challenge for us during the starting stage of development. We took some time to get familiar with the AB3 code base, while also deciding features to adapt/remove to develop EduConnect.
In version 1.4, the debugging stage required strategies to address several challenging issues, such as regex validation and parser support for multiple timetables. Through effective teamwork and collaborative discussions, we successfully resolved these issues.
Effort Required
Efforts were allocated across various project phases, including requirement analysis, design, development, testing, deployment, and debugging.
We also emphasized considerable efforct on team collaboration to make the development process smooth.
Achievements
Successful implementation of core functionalities, including finding common slots and copying student emails, which showcases our goal of creating an application with user-centric features.
Implementation of GUI(Graphic User Interface) which aligns with the UI design as outlined in the project planning phase.
Adherence to project timelines and deliver the milestones on time.
Appendix D: Planned Enhancements
Team Size: 6
Use a better font: User experience is greatly influenced by font, and choosing the right font can significantly enhance readability, Especially for EduConnect with numeric details of students displayed, the current font causes confusion sometimes. We plan to adapt a new font which not only improve the overall appearance of the platform but also contribute to a smoother reading experience for users. Currently, we are aware that the number
1and the letterllook too similar to users.Hover over ‘Project Link’ shows the full link: Currently, when hovering over the project link, nothing will be shown. We plan to provide users with the convenience of viewing the full link by simply hovering over it. We aim to allow users to quickly verify the complete URL without having to click on it.
Show partial ‘Project Link’ in UI: Instead of simply a text
Project Link, we plan to show the domain name and Top Level Domain (TLD) of the link. For example,https://ay2324s2-cs2103-t14-1.github.io/tp/UserGuide.htmlwill show up asgithub.io.Better timetable display: The current timetable of each student is displayed in text with little formatting. We plan to enhance the timetable display by incorporating a standardized graphical format, such as calendar or grid layout. This would allow users to quickly grasp their schedules at a glance and navigate through different time slots more efficiently.
View student details: The ability to view comprehensive details of each student in text, including their project link and timetable, is essential for effective management and communication within EduConnect. We plan to introduce a new "View Student" function, allowing users to access all student information conveniently.
Full Name display: If the student's name is too long, the name may be shorted and display
[partial student name]..., leaving users unable to view the full name. We plan to limit the length of the name to 100 and ensure the minimum window size would allow the full name to be viewed at all times.Limits to Telegram Handle, Email and Tags: There is currently no character limit for the
Telegram Handle,EmailandTagfields. We plan to limit these fields to an appropriate character count to better represent these fields. Example:- Telegram Handle maximum length is 32 characters according to here.
- Email maximum length is 320 characters.
- Tag should be sufficiently long but not too long as they are used as groupings. We estimate around 40 characters to be more than sufficient.
Editing Student with the same details: Currently, when editing a student with the same details, no error message is displayed and EduConnect updates the Student with the same data. This is may confuse users and it will result in no changes while still showing a successfuull update. We plan to add a check and display the proper error message. E.g. A student with telegram handle
@bunny, when running the commandedit h:@bunny h/@bunnyshould return an error messageDuplicate telegram handle supplied.Saturday and Sunday timetable: Add an option to enable/disable Saturday and Sunday in the timetable. Currently, only Monday to Friday are enabled and periods can only be added within these 5 days. Extending the feature to 7 days will help for the situation where there are weekend classes.